


Friday 13 July 2007
In the first article I explained how the Sims genetics system works. It is certainly one of my favorite features of the game, but even if you have downloaded default replacement skins and eyes as I recommended, it’s a lot more fun if you can make all of your custom content inheritable.
This is the second of three articles:
- Genetic inheritance in The Sims
- Making custom content inheritable
- Modifying a Sim’s genes
Making Hair Packages Inheritable
The genetics of Sims hair is determined by which color bin it falls in. Many custom content creators already put their hair into the appropriate color bins, which means you have nothing to do to make the color inheritable.
There is a color-binning plugin for SimPE, which I have half-heartedly tried a couple times and failed to figure out. Most of my hair is unbinned, and I work around it by modifying my Sims’ hair genes manually, as I will explain in the next article.
There are tutorials out there for using the color-binning tool, so I won’t go into that here. However, it is possible to directly edit the hair packages individually with SimPE, and I will explain that.
- Open the hair package file by selecting File…Open in the SimPE menu bar and browsing to your download folder to select the file. Yes, you need to know the filename; and no, sadly, I don’t know any easy way to determine the filename by inspecting one of your Sims.
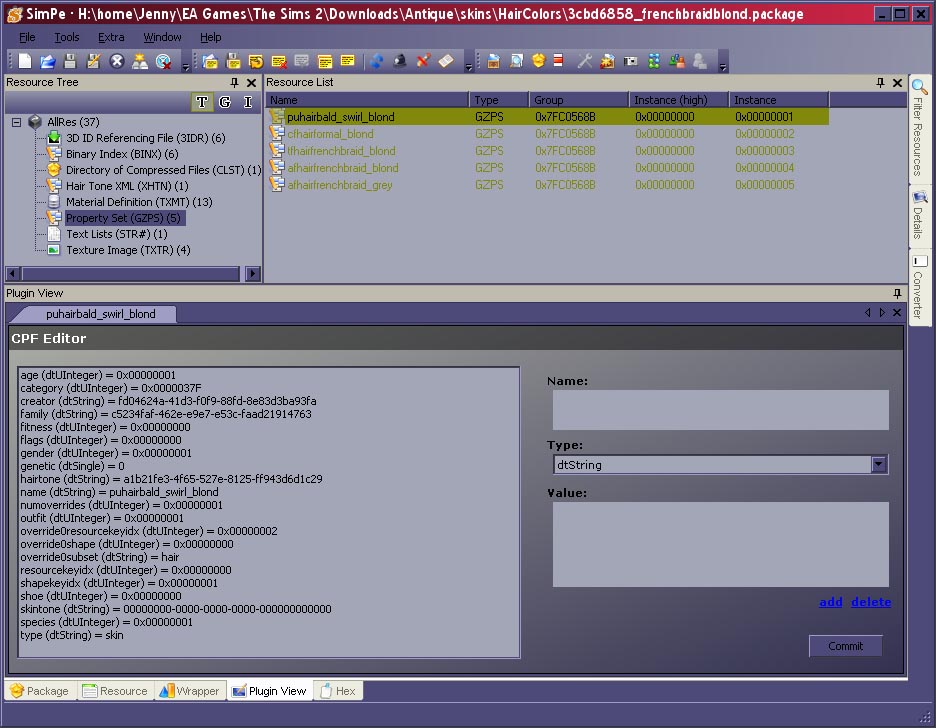
- If you’re still with me, in the top left pane select Property Set (GZPS).
- In the top right pane, there should be at least one line, and usually more. These are the properties for each of the ages. For a female hair, as in my example, they would start with “tf” for the teen style, “cf” for the child style, etc. You will have to change the values for each of the ages in turn.
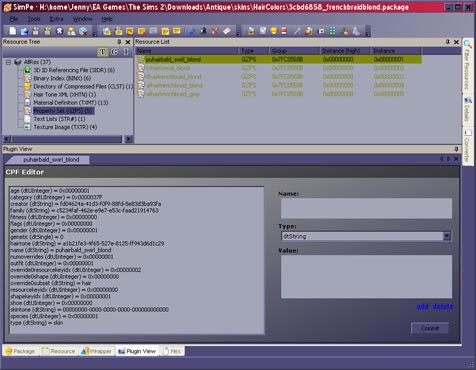
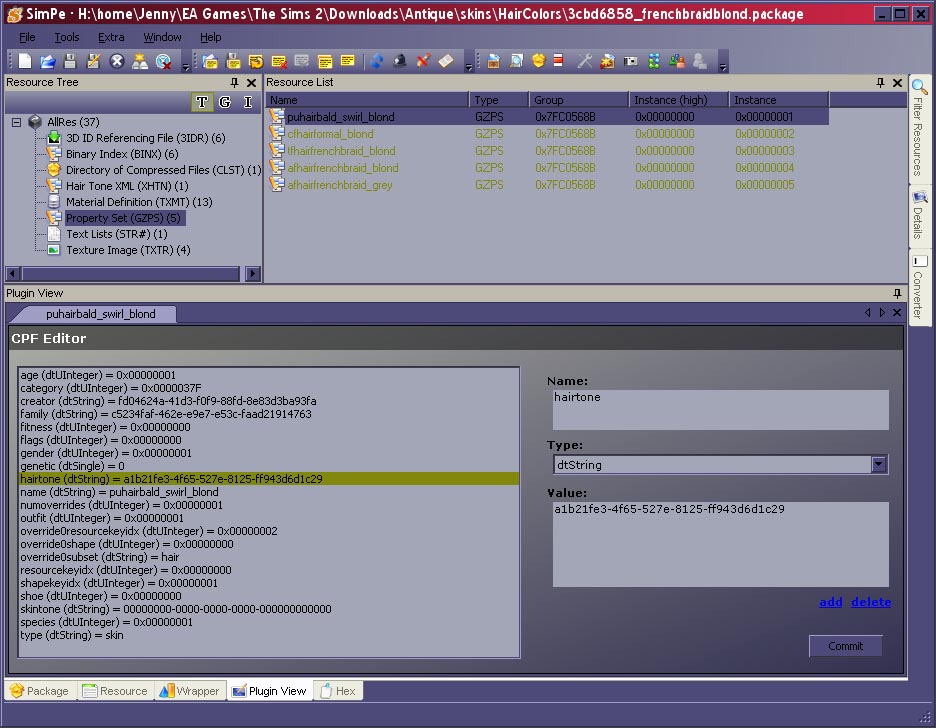
- Click on the first item in the list. In the bottom pane, in “CPF Editor”, you should now see a list of values. Click on the one labeled hairtone, and a value will appear in the Value field on the right side. If this hair is not yet color-binned, it should be some crazy random value, as here:
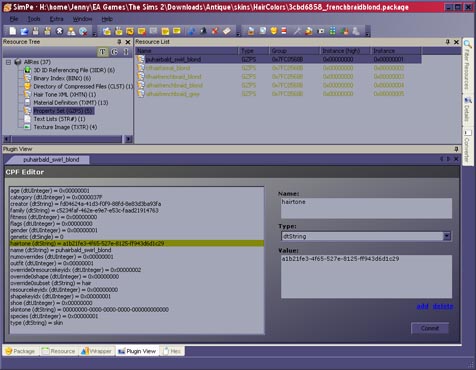
- Delete the value in the Value field and replace it with one of the following values, depending on which hair color bin you want this hair to fall in:
for Black: 00000001 – 0000-0000 – 0000-000000000000 for Brown: 00000002 – 0000-0000 – 0000-000000000000 for Blond: 00000003 – 0000-0000 – 0000-000000000000 for Red: 00000004 – 0000-0000 – 0000-000000000000 for Gray: 00000005 – 0000-0000 – 0000-000000000000 - Click the Commit button on the lower right corner of the screen.
- Now repeat steps 4 through 6 for each of the items in the top right panel. Make sure you select hairtone and not one of the other items with a crazy series of letters and numbers after it, and always remember to click Commit after each one. (If you do not, it will remind you, anyway.)
- When you have changed the hairtone value for each of them, save the package by selecting File…Save in the menu bar.
Now when you start your game, the hair should appear in the correct bin. Furthermore, any Sims who have this hair in their DNA (not simply having taken this hairstyle by using a mirror for a makeover) should pass the color along to their future children according to the game’s genetic system.
It is a lot of work to do it this way, so if you have more luck with the color binning tool than I had, that is probably the best way to go.
Making Eye Packages Inheritable
To my knowledge there is no special plugin for making eyes inheritable, but it is much less hassle than hair. (Although, again, you need to know the filename of the eye you want to change.)
- Open the eye package file by selecting File…Open in the SimPE menu bar and browsing to your download folder to select the file.
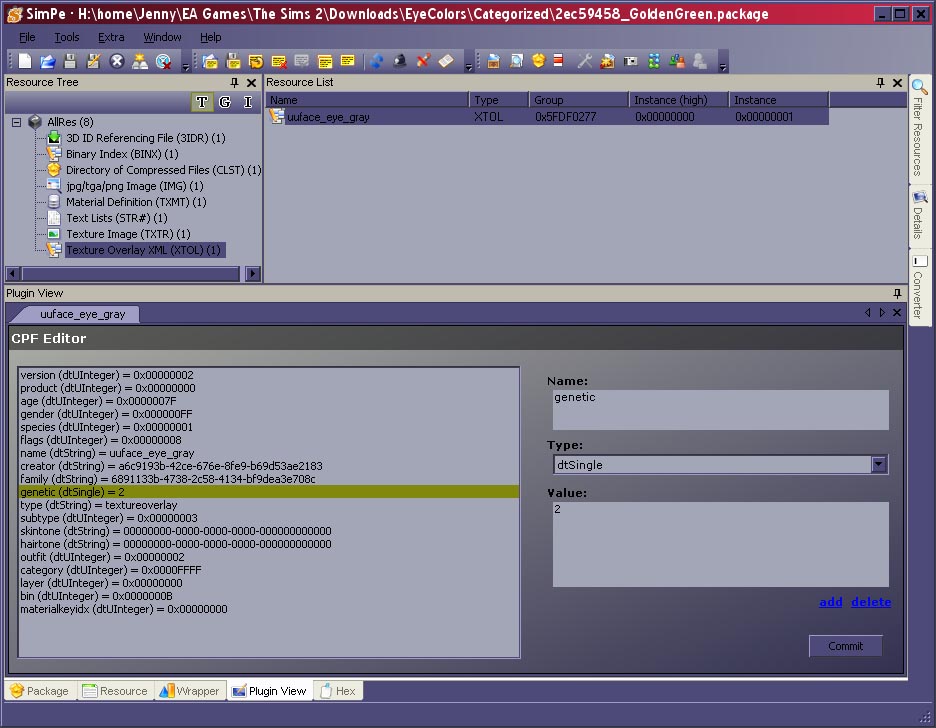
- In the top left pane, select Texture Overlay XML.
- In the top right pane, select whatever value appears there. (There should be only one.)
- In the bottom pane, CPF Editor, select the item labeled genetic.
- A value will appear in the Value field at far right. For un-geneticized custom eyes this value should be 0.
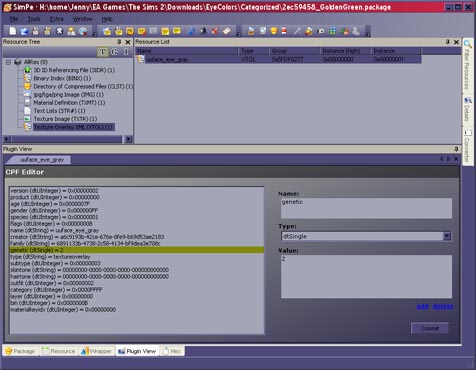
- Delete the value in the Value field and replace with one of the following values:
I have listed the eye colors that I have assigned to each value, but you could set yours differently. For example, set violet eyes to 1 if you want a nation of suitable suitors for Gwynn.for Dominant (brown): 1 for Recessive (dark blue, blue, green, hazel): 2 for Very Recessive (violet, gray): 3 for Super-Duper Recessive (???): 4 - Click Commit.
- Save the changes using File…Save.
Making Skin Packages Inheritable
Making a skin genetically inheritable works much the same as for eyes.
- Open the skin package file by selecting File…Open in the SimPE menu bar and browsing to your download folder to select the file.
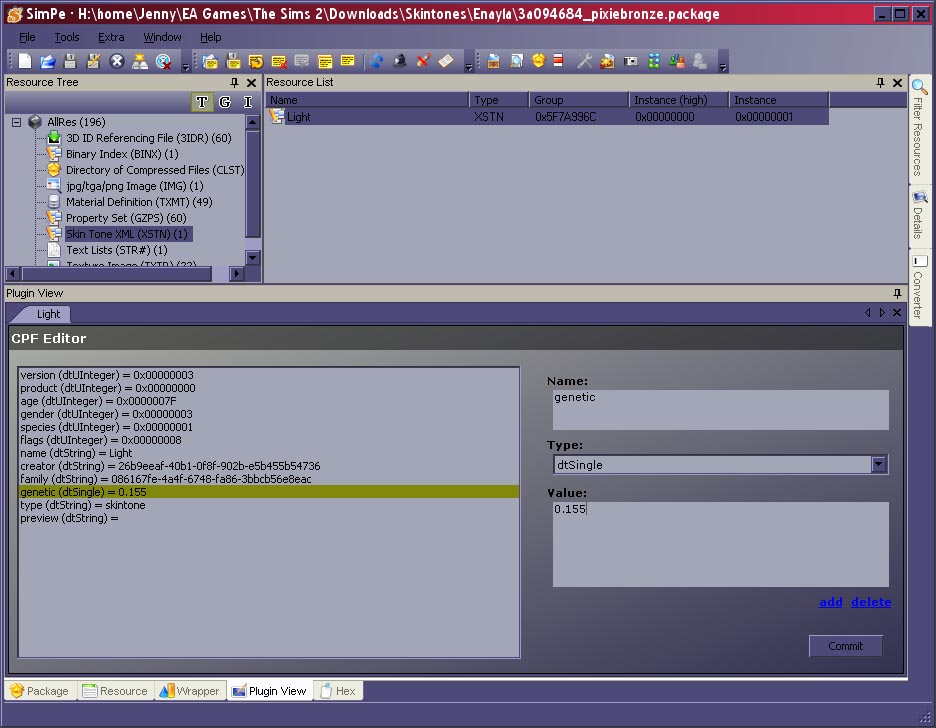
- In the top left pane, select Skin Tone XML.
- In the top right pane, select whatever value appears there. (There should be only one.)
- In the bottom pane, CPF Editor, select the item labeled genetic.
- A value will appear in the Value field at far right. For un-geneticized custom skins this value should be 0.
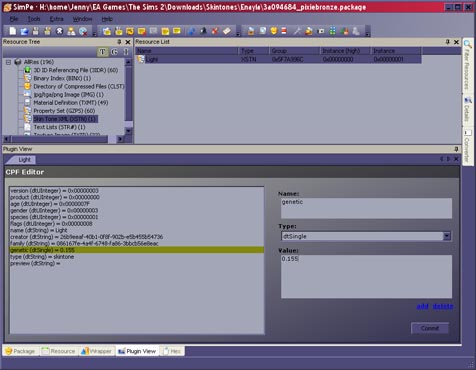
- Delete the value in the Value field and replace with the desired genetic value, as a decimal number between 0 and 1. In my example I have set Enayla’s Pixie Bronze skin to use 0.155.
- Click Commit.
- Save the changes using File…Save.
Choosing the value
The tricky part about setting skin genetics is choosing the right value. The default skin colors use 0.1 (Light), 0.3 (Tan), 0.6 (Olive), and 0.9 (Dark). Your skins should be rated such that a skin that is darker than Olive and lighter than Dark should get a value between 0.6 and 0.9. However, if you have dozens of skins, it is more fun to make sure that all of the skins are rated with respect to each other as well.
The easy way
Before I explain how I did it, I will give you an easy way out of all this work. The Genensims site seems to have a wide variety of skins available for download which are already rated. These include Enayla’s skins, which are what I use on most of my Sims. They have already taken the time to organize them all from lightest to darkest, so you don’t have to. Their ratings are not the same as mine, but I myself would never have gone through all the work if I had known about that possibility.
If you download skins from there that you already have, make sure you delete (or archive somewhere) the non-modified skins, though, since the game doesn’t like when you have duplicates of custom content. And see below for more information about a further caveat if you download the NPC skins from there.
The fussy way
If you are a control freak, however, or if you ever need to rate a skin that they don’t have, you will still need to get a rating value. One thing you could do is open CAS and try out each skin on a Sim, taking a screenshot of each one. That seems to be what they did at Genensims. I didn’t do it that way because it is not necessarily easy to match up the skin with the skin files at that point.
Instead, I used Clean Installer to open my directory containing my skin files, and I viewed the preview image of each one. Since a skin contains many images, I scrolled through them until I found the adult female body image. Then I took a screenshot of that preview window, and while Clean Installer was still open and pointing to the file, I wrote down both the filename and the description of the file. I also made sure to name my screenshots appropriately.
When I had all of my screenshots ready, I opened them in a graphics program that could display them all as thumbnails and sort them all by file name. Then I began renaming files so that the file names started with a number from 000_ to 100_. Those corresponded to the decimal values I would give them later. I also included screenshots of the default skins which I gave the names starting with 010_, 030_, etc. Those files I never renamed, and they served as reference points for the others.
I should mention that it’s perfectly OK to give two skins the same genetic rating if they are exactly the same shade. This is especially likely to happen if you have a skin based on another, such as with tattoos added.
As I renamed files, the program kept resorting the thumbnails by name, which allowed me to see how they looked in series, to make sure they truly were going from lightest to darkest. When I was finally satisfied that they were in the correct order, I tweaked some of the numbers a little more so that skins that were very close in shade were very close in number as well.
When it was all done, I had only to open each of the skin files in SimPE and assign the value from its corresponding screenshot file. Of course, I kept the screenshots around so that whenever I get a new skin, I can take a quick screenshot, put it in the directory, and see where it fits among the others.
You can also view and/or download my screenshots, and if you’re using the same skins as I, you can simply use my values.
Making Skins and Eyes Townie-Enabled
Another thing you might do while you are modifying your skins and eyes is make them so that they can be assigned to new townies and new NPCs. Theo at MATY found a way to do it, and though I’ve never tried it, I’ll add his instructions in here.
In the case of eyes, it is quite easy: while in SimPE change the value in creator to 00000000 – 0000-0000 – 0000-000000000000. Also, if the flags value is set to 0x00000008, change it to 0x00000000. Afterwards, I believe these eyes will appear among the default eyes, which means at the far right of the list of eyes in CAS.
The same can be done for skins, by changing the creator and flags fields, just like for eyes.
HOWEVER there is an unfortunate “bug” with Townie-enabled skins: the skins no longer appear in CAS! They are no longer considered custom, but there are only four slots for displaying non-custom skins, so the game simply doesn’t display them. They are still in the game and your Sims and Townies may still use and inherit them, but there is no way to assign them during CAS. (Though I suppose it’s possible one could get them by clever use of parents of selectable, genetically inheritable skin colors and much clicking of the pacifier… hmm…)
If you don’t mind that, you can always change their skins to the one you want later on using SimPE, according to the instructions in my previous article.
For this reason I’ve never modified my skins for this purpose, and also because I hardly ever use NPCs or Townies in my story. My one Sim with townie-enabled eyes only has them because I downloaded the eyes already townie-enabled, and I created him using the Tombstone of Life & Death rather than in CAS. Who was it? This guy!

(Image emphatically requested by V, so don’t blame me.)
Yes, that's right, everyone can blame me! I'm not ashamed to admit that I find Imin attractive... well... okay, sometimes I am, but only when he's acting like scum. Which means most of the time, so... yeah, I'm pathetic. But thank you for indulging my peculiarities, Lothere!
I've been using Theo's hair binning plug-in for a while now. It's fantastically easy once you get to used to it, and can even have the added bonus of having only one grey per hairstyle. Oh, and it bins eyebrows and facial hair! That's really handy, as I hated having to shuffle through all my custom eyebrows. Since you're doing these tutorials for us, perhaps someone should do a plug-in tutorial for you?
Ahhh, I didn't know you could townie-enable skins! Too bad that you can't select them afterwards. I suppose if I were really crazy I'd clone all my skins, rename and change them, but that'd add a load to my downloads folder that I don't need. I will, however, be using your skintone number range, as when I was starting out I just numbered them willy-nilly without much attention to where they fell according to each other. Your way seems much handier.